Friday, June 17, 2016

Up-cycle Denim Skirt from Old Jeans

Good Morning!
Here it is Friday morning again; I've been wainting for the morning dew to dry and get onto my yard work.
I also got inspired to make this Up-cycled Denim Skirt from a pair of the Ole Man's worn out jeans.
It would be like a boyfriend jeans except they are the hubbies worn out jeans.
they were definitely ready for a new life. 

He decided to go through his overrun closet last night. He had a shirt he needed some buttons resewn. As he tossed me the shirt, he flung the pants in the floor and said, "You don't won't these do ya? I'm going to through them away. They're done for."

Of course, I said,"Yeah I'll take 'em"
So once I had finished the button repair this morning, I just grabbed them up and got to remaking.


Blue Jean Upcycle


They were very worn out!
The crouch was blown out and there was quite a bit of holes in the butt.
I thought they'd be a good fit for this project. 
In my minds eye, the more worn and tattered they were the better.
I started by cutting the legs off about knee length.
You may want to try them on to get the length right.
I also wanted to be sure I could actually fit these.
They were a little roomy but I thought that would be a good thing.


After you cut the legs off, take your seem ripper and open the leg up.
You should also open them all the way to just below the zipper.
I just cut them at that point there was really no fabric left there.
On the back side, I ripped them to about four inches from the center back yolk.
To get the fit right for yourself, you may want to open them up all the way to the center yolk.


I used the fabric from the legs I cut off for the center insert.
Open up the pants and lay it flat.
Adjust them until you can get it where they will lay flat.
Then simply pin your fabric in and sew in place.
Do the same thing on the back of the skirt.


I kept it simple with the hem.
I just sewed a straight stick all the way around the bottom.
the fraying and raveling will be what I want for the hem. 
A time or two in the wash and it should have that covered.


I cut the tags off  and patched the holes that were in awkward places with more of the leftover leg fabric.
Believe it or not, I also went back and roughed up a few places with a file.


It was a done project. 
It was also a pretty fun one as well.
You could get even more creative with this if you wanted; using different color fabrics in the center piece.
Thank you so much for stopping by and checking out 
this Denim Skirt DIY.
but..
the grass is dry and I better get moving on.

As Always..
Be Blessed!


Friday, June 10, 2016

Black Sack Dress DIY and Some Rambling

Good Friday Morning!
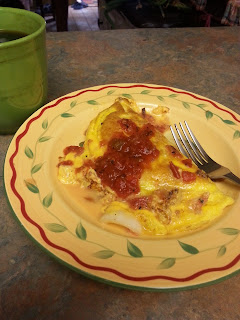
Spicy tomato and Veggie Omelet


I thought I'd share some of my goings on this week as I had a cup of coffee and breakfast. 
Today, I'm chowing down on what I'm going to call my 2 Egg Leftover Omelet. The reason I say that is that I throwed in leftover salad makings from supper and topped it with some leftover spicy canned tomatoes. I wasn't sure about the radishes and celery going in there but I like it.
It looks a mess...but..mmm ...it's good!

I'm also waiting for the dew to dry off the grass because Friday's is my yard mowing day. We've had some cool nights this week and the grass is extra wet.

I've also got our local AM station playing this morning. They've put me in and extra special good mood with all the beach music they're playing in honor of our very popular Hot Fun In The Summertime Beach Music Festival here tomorrow in Stuart, Virginia. It's all Carolina Style Beach music. It's altogether different than the California style. 
I'm talking the Tams and Chairman of the Board!
Growing up a Carolina Girl..I love it! 


I'm no dancer but I love to see a couple dancing the Shag
My Favorite Charlie and Jackie..


Now wasn't that fun!!
                                Well lastly, I'm going to share what I'm calling my Black Sack Dress..DIY.


It started with this little denim dress I bought at Cato. I really liked the fit and it was pretty dang comfy. 
I used some black fabric I already had and used the denim dress as a pattern. 
I made a few changes like short sleeves and I went with some simple pockets. 


LOL..it's comfy...
but I'm not sure I like it. 
Do ya'll do projects like that?
I'm not sure what about it doesn't satisfy me the most. 
Maybe it's the fabric that doesn't hang quite right..or just the blackness of it all..and I wear a good bit of black but..
I'm just not sold on it.

Well that's the end of my rambling for today. I think the grass is dry.
I thank you for stopping by and sharing a little bit of Friday with me.

Be Blessed!


Wednesday, June 1, 2016

Queen Bee Country Apron

Hey ya'll!
Happy June 1st!

I've got the sewing bug again. 
Today it's this ruffled, very natural country apron with my new obsessive queen bee stencil.

Almost ever since I have been whipping stuff up in the kitchen, I have usually kept an apron hanging up. 
I know my love for aprons comes from watching my Grandma Hylton bustle around in the kitchen hair bunned and apron on.
But ...
I have sometimes been reluctant to put it on.
A lot of times, I just had something country-style with some gingham or calico print; sometimes they would simply tie around the waste; sometimes they would be ones that would be more similar to this one as to slipping over the head. 
I would be well into my recipes or the dishes before I'd remember to tie and slip one on. 
Lately, I have become much more obsessed with tying an apron on. It simply saves my clothes.
I have been cheating quite a bit lately and just cutting a apron out of some scrap fabric and tying it on...no hemming..no anything. When it became soiled I would ball it up and through it in the trash.

A few weeks ago, I clocked into work and was getting ready to get busy when a co-worker asked my what was all over my shirt. I couldn't see anything but when I went to the restroom and looked in the mirror I had grease splatters all over the front of my shirt. 
I  looked dang messed up!!
Since then I made me a quickie apron with the bib to be sure to keep things off my top.
The quickie was more aggravation than anything because I simply didn't do it right.
With all that lead in...
I finally took the time to make one bonafide! 

Priscilla(dressform) was kind to model as I patterned it out. I fashioned some great big pockets on the front. 

It has crossback straps to easily slip over my head.
I chose this natural looking fabric from my stash, a favorite of mine lately.
I thought why not go ahead and add the ruffle...
and the bee stencil.
Well there you have it!
You can see what I've been up to today...
What projects have got you going today?

As always 
Thank you for stopping by for a visit.
Be Blessed!

Sunday, May 29, 2016

A Little Red, White and Blue


Remember the Fallen for this Memorial Weekend


Be Blessed!


New Paint for Our Old Bathroom

Hedgegrow Olive Glidden Paint with Stencil
Good Sunday Morning!
I am hoping ya'll had a wonderful and productive week.
Work has been slow at the plant so my department has had to take some additional time off.
Being big on time and short on funds was bringing me down. 
Looking at the state of my bathroom was also bringing me down. Instead of focusing on what I couldn't get done I just went at the week and the bathroom with the do the best with whatcha' got mentality.

We only have one bathroom in our home; so through the years it has been used to a frazzle.
Between the kitchen, the kids rooms and the bathroom I don't know which has been repainted and repaired the most but I'm pretty sure it's been the bath. When most of the kids was home it would take some strategic planning to get anything done in here. I could have done well to have installed a revolving door . Now we're down in numbers to just The Ole' Man, Jack and Me. Getting things accomplished and keeping them that way is becoming a bit easier. 

I think I have surely avoided taking pictures in the bathroom so to show some real good before and afters I'm not going to be able to do. 


Honestly from looking at this picture it doesn't seem that there was a change in color at all.
Previously my walls was much more blue in tone.
To tell the real truths, the last time I painted I mixed a half a bucket of dark blue paint I had used in Jack's bedroom with a smidge of yellow paint I had left over from painting the kitchen walls. I don't know what color I could actually claim it to be but it was definitely blue.


Our bathroom was old and when I first moved in we didn't even have a shower. With that being said when the shower was added a vent fan should have been added as well.
But it wasn't...
So fighting mildew has been a real struggle.
Someday, I'm sure the ol' man will do it but until then the fight continues.
Above the shower was yucky!!
I can't even show a before picture because it was yucky!!
I would have gone nuts overs a picture of that. Even after trying numerous cleaning products and hacks off pinterest, after being cleaned the paint remained somewhat stained. 
The Best cleaning hack for cleaning mold and mildew I found was plain old Hydrogen Peroxide.
I would buy the big bottle in the health and beauty department and mix about a half a bottle with two big squirts of liquid dish soap in a smallish bucket of warm water. then scrub like crazy. 
It did do a good job of cleaning it.

The next big deal with this little redo was the ol' man researching the heck out of the internet and reading, who only knows how many reviews for a good primer.
What he found and bought was Zinnser's Mold Killing Primer.
Zinnser's primer was the only primer that not only claimed to cover up stains from mold and mildew but claims to continue fighting it.
The price for this primer was about $35 at our local home improvement store. 
It definite covered well and I'm feeling good about it's claims.
If  I become a doughter  I'll let you know.


For my wall color I chose Pacific Pines Sage.  
It's one of Glidden's Paint colors 
but 
to save on the dollars, I went with the Color Place Paint from Wal-Mart. Most the time I have used it in the past and it's seemed to do as well as when I've paid more for higher priced paints.
It turned out to be a true green, which I was looking for.
I trimmed out my doors and painted the ceiling with white gloss enamel. I didn't repaint my doors.


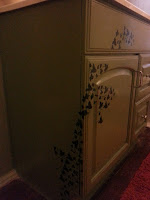
stenciled cabinet


The sink vanity I painted Hedgegrove Olive. Also a glidden color with Color Place Paint. 
I wish you could see the contrast as well in the picture as in person. It was definitely darker green but still gave a good harmony to the room.


I have been addicted to the stenciled and distressed furniture for some time now but an artist and a painter I'm not so I aided myself with a stencil to add the Ivy that runs up the side of the cabinet.
I lightly sanded the edged and a little here and there before the stenciling began.
I also gave the stencil and the bare wood a spray or to of clear enamel paint to just seal it from the moisture that's prone to be in the room.


Thank you for stopping by for a visit!

As Always
Be Blessed!