Showing posts with label Country Crafts. Show all posts

Friday, September 30, 2016

DIY Vintage Fabric Pumpkins

Hey Ya'll 
&
Happy Fall to ya!
I hope that all is well with everyone and that the fall crafting bug has bit you too. I don't know why it has taken me so long to get this project done. I been wanting to do it for so long but I just never seemed to get around to it.
Well.. I finally did it and it's one of my favorites and it was so..sooo.easy!
It all started by saving last years pumpkins stems for the one we carved.
These pretty awesome fabric scraps I found in the scrap bin at work.
I have seen pumpkins done in all kind of wonderful fabric like velvet, ticking, burlap..and so on but I didn't have any that just screamed pumpkins to me.
Lol..I don't know why these did...
I really just thought the fabric had such a vintage feel. Especially, the green one, it reminded me of the drapes that hung in our babysitter Mrs. Hall's home.
I think that's one of the most important parts to doing true DIY's with vintage feel. It's finding fabrics in maybe unsuspecting placing and saying that would look great as..whatever your fancying. I suggest keeping an eye out at Goodwill and consignment type stores. Most the time there is some real funky kind of fabrics there that just need to be recreated.
As you know with me the main thing is to do it on the cheap! 

Yes..I'm sure I'm cheap!
The subject of me being cheap leads me to show you what I used as stuffing for these pumpkins.
I used my scrap fabric. 
You know it's got places or been cut to giblets to the point there's nothing to save. I find that it's the perfect stuffing for alot of the vintage-y crafts. It will be pretty heavy and lumpy.
I don't know why I find that to be about perfect for imperfect craft.
If it was something done way back in the day that's what they would have done.
Don't ya think?? 
Basically, lay your fabric out.
Then find something big and round for your pattern. I used my Rada Pizza Stone for the big green pumpkin.

I also got my thread and a pretty big needle and scissors.
You'll need to do some basting.


Baste stitch all the way around your circle edge.
Then gather. 
This is where it went a little wrong. When I started gathering. My thread broke. I could tell this was not going to be my option.
I needed something stronger that would hold.


So I pulled out the good ole dental floss.
It's very strong and it will work fine.
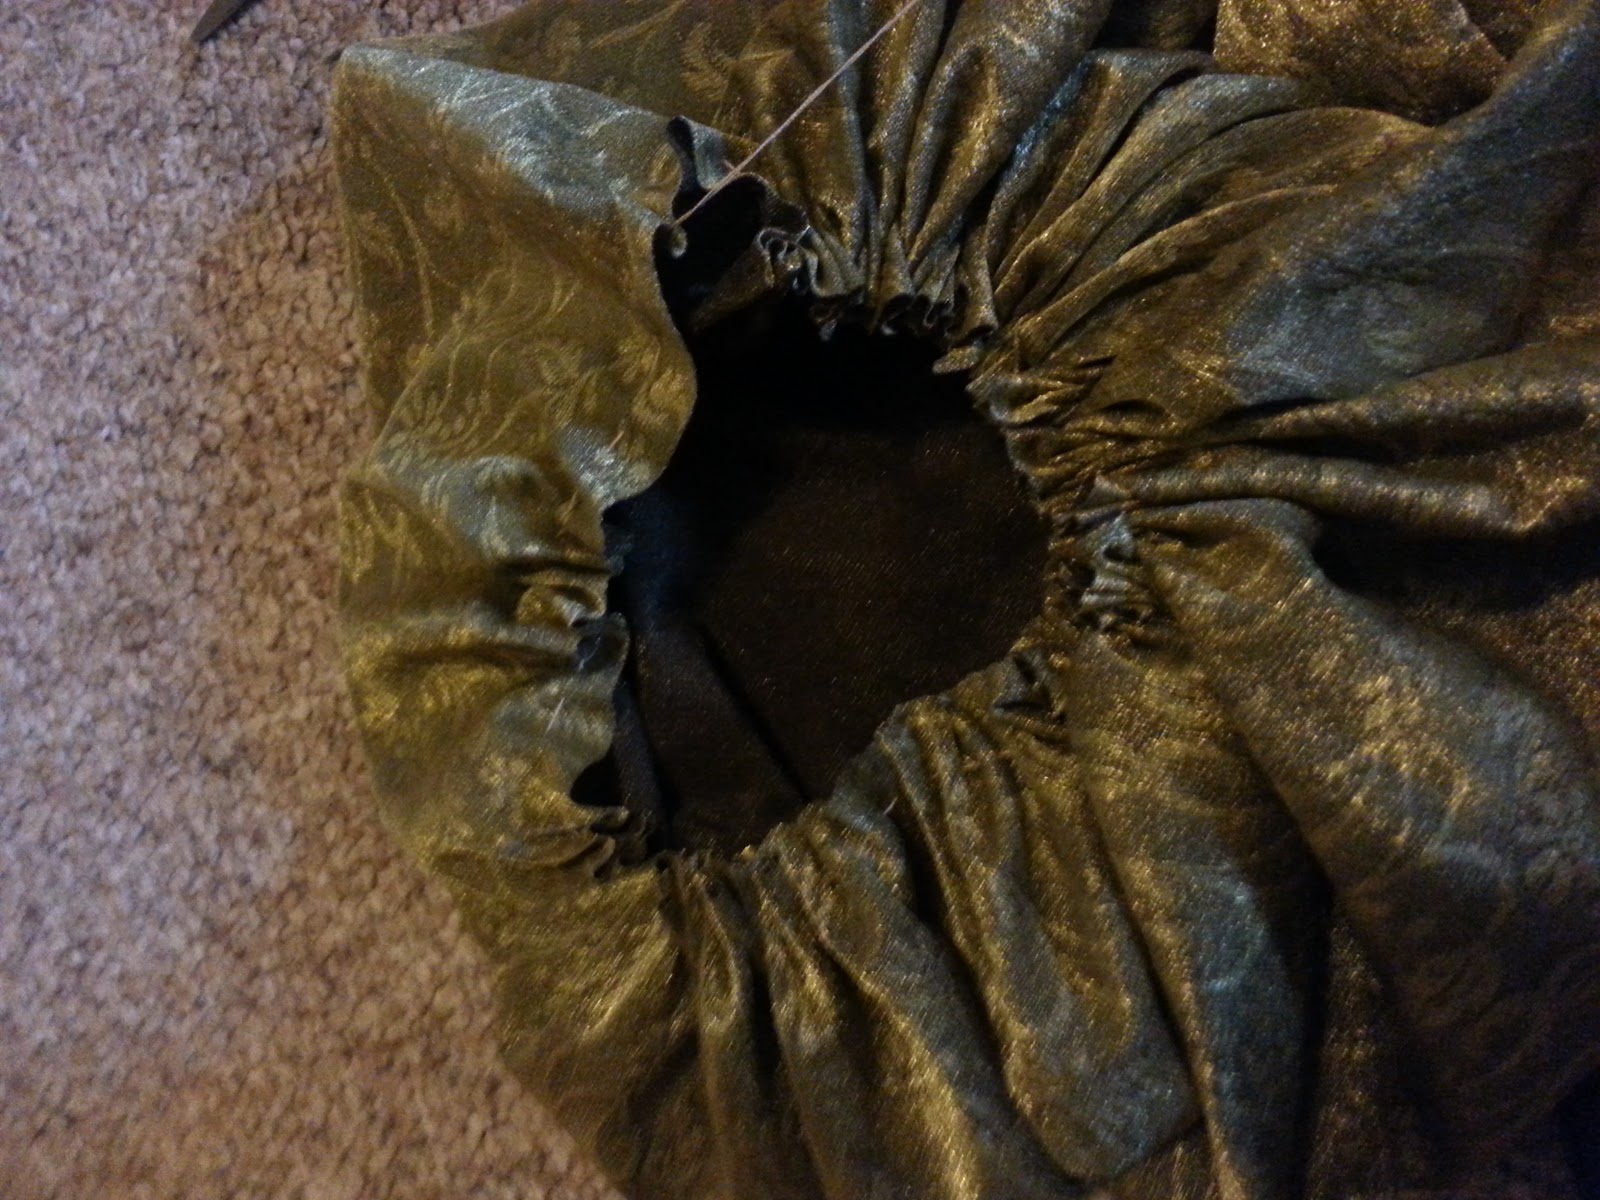


Gather and Stuff
After you stuff, Stick your stem in and pull the fabric tight around it.
I also tide some raffia around the stem. It sort of hides the gathers and just adds to the look.

That's about all there is to it.
I hope you'll give this DIY Fabric Pumpkin Project a try.
As always, thanks so much for stopping by for a visit.

BE BLESSED!


Monday, July 18, 2016

Magnetic Monday


Good Monday Mornin'!

I hope everyone had an especially nice weekend. We did around here. We weren't up to anything very outrageous but it was sure nice to have the time off from work. We did enjoy a very nice family get-together at my sister house. She invited all the family down to a cookout especially for their son Ryan who had came in on leave from the Navy. 
You can't beat a good burger and a dog!


I also got off the fence and signed up to be a Magnabilities Consultant. A friend at work introduced me to this custom jewelry line. I started with a necklace/insert combo for my Mama for Mother's Day.
I'm often hooked with a gift I can add to later!

The brochure was full of all kind of necklace, bracelet and even ring combinations. Choices of several varieties of inserts, pendants, chain length's and styles. The options are totally endless.
I was wooed in with this necklace I'm showing here.
You know it!! 
Honeybee!!
Then I learned I could download any picture I wanted and make it into custom pieces.
How cool is that!

Well Mama's birthday is coming up so I thought I'd get her some to add on to her necklace; 
of course 


                    I wanted to add to mine, too...
So I figured I may as well join up with Magnabilites.
I could see I had already formed some kind of love affair...
                    .....so I did..


Now I've downloaded my barn picture. 
I photographed this barn a few years ago and it's been one of my favorite pictures I've ever taken. I have thought of having it framed or something to display in the house
but 
nothing was ever quite right.
I think this was a great option.


Pretty cool I thought!

Now, I've shared what's had me fascinated this weekend.
What has been your attractions lately?

I thank you for stopping by.
Be Blessed!

Wednesday, June 1, 2016

Queen Bee Country Apron

Hey ya'll!
Happy June 1st!

I've got the sewing bug again. 
Today it's this ruffled, very natural country apron with my new obsessive queen bee stencil.

Almost ever since I have been whipping stuff up in the kitchen, I have usually kept an apron hanging up. 
I know my love for aprons comes from watching my Grandma Hylton bustle around in the kitchen hair bunned and apron on.
But ...
I have sometimes been reluctant to put it on.
A lot of times, I just had something country-style with some gingham or calico print; sometimes they would simply tie around the waste; sometimes they would be ones that would be more similar to this one as to slipping over the head. 
I would be well into my recipes or the dishes before I'd remember to tie and slip one on. 
Lately, I have become much more obsessed with tying an apron on. It simply saves my clothes.
I have been cheating quite a bit lately and just cutting a apron out of some scrap fabric and tying it on...no hemming..no anything. When it became soiled I would ball it up and through it in the trash.

A few weeks ago, I clocked into work and was getting ready to get busy when a co-worker asked my what was all over my shirt. I couldn't see anything but when I went to the restroom and looked in the mirror I had grease splatters all over the front of my shirt. 
I  looked dang messed up!!
Since then I made me a quickie apron with the bib to be sure to keep things off my top.
The quickie was more aggravation than anything because I simply didn't do it right.
With all that lead in...
I finally took the time to make one bonafide! 

Priscilla(dressform) was kind to model as I patterned it out. I fashioned some great big pockets on the front. 

It has crossback straps to easily slip over my head.
I chose this natural looking fabric from my stash, a favorite of mine lately.
I thought why not go ahead and add the ruffle...
and the bee stencil.
Well there you have it!
You can see what I've been up to today...
What projects have got you going today?

As always 
Thank you for stopping by for a visit.
Be Blessed!

Monday, April 25, 2016

Flour-Sack Hand Towel DIY

Good Monday!
I  think I'm going to ramble for a sentence or two and then I'll give you 
the low-down on
My (faux)Flour-Sack Hand Towels.

I hope every ones weekend was a wonderful one. I can truly testify that mine was. We had a lazy Saturday here around the house. I had some wants to run off to a Vintage and Greenliving show just down the road but it just didn't go that way.
My Sunday I enjoyed going to my sister's church for the baptism of her daughter. 
It was truly uplifting and I do have to say I enjoy her church family!

I started out today feeling very positive. You know how that goes this world we live in 
will do it's best to steal that joy..uggh..LOVEe thy Neighbor..Right?

But I got back on track and finished up this little DIY.

I started out with this beige and very natural fabric I found. 
It is very soft and absorbent. I've incorporated it for some time in many projects.

My thoughts are that I really do like the grainsack, feedsack, or floursack designs and look but those clothes would not truly be enjoyable to use as a hand towel, even though I bet in times past the nice terrycloth towels we use today were not used. 
I'm sure these clothes were used more times than not.


Here I go again with my handy stencils and sharpie.

I taped my lines with some regular scotch tape 
and 
colored in my lines.
I then added some lettering.

Afterward I simply turned the sides and straight stitched them and cut about a 2 inch black strip of cloth;
Sewing it to the ends for binding.


This was my first go around at this project. I feel like I'll be tweaking and trying it again. 
Especially since I ordered some stencils this weekend with this DIY in mind.
My Ole Man doesn't have any idea about this one yet.
It's fun to see his face with some of my zany projects.

Thank you for the visit!
Be Blessed!


Wednesday, April 6, 2016

Farmer's Market Sign-DIY

Good Mornin'!
Hello to all those out there in blog-land!
Here in Virginia this morning it is a chilly Spring morning; the kind that makes you nervous for all the plants and trees budded out. Freezing temperatures have got me moving and covering up plants I had put out a few weeks earlier when it was warm like a nice summer day. One ole fellow in the community referred to it as Dogwood Winter. I had never heard of that saying but it sounded neat to me so I wanted to share it with ya'll.

For some time now, I have been hankering for one of those beat up old country type signs that are so popular in Farmhouse and Country Decorating.
 So this morning I have my Farmer's Market Sign to share with you.


I started out with this slab of wood I brought home from work the other day. 
It was wide but thin and it being so light weighted it would be easy to hand it. 
It was good and rough as well which made for less distressing.


Yesterday, I gave it a swipe or two of white paint I had left over from painting my kitchen cabinets. 
The rough, porous wood soaked it up quite well.


I used a stencil I already had. 
I don't have a had for doing lettering so some kind of aid is a must for me.
A sharpie worked fine for me.


The Ole Man may cringe when he sees I screwed it right up with a couple of black screws I had in the junk drawer but I thought they added to the utilitarian look of it all.
I hope you enjoyed this project
and 
you are inspired to make one of your own.

Thanks for stopping by for a visit.
Be Blessed!

Wednesday, December 9, 2015

Christmas Wreaths 2015


I've been trying to get my holiday decorations up. I've said in the past, I don't flip the switch into the next holiday. I'm more of a transitional decorator.
I make my wreaths out of running cedar that I find in the woods. 


I think the best decor for anyone is looking to what is relevant to your area. It makes it personal and yours.
I hope you all are doing the little things that make this time special.

Thank you for taking a look at what's been going on around here.
Be Blessed!

Tuesday, November 17, 2015

Vintage Pillows


Hey and a Good Tuesday to ya! 
Do you ever just wake up with an overwhelming notion to do something? Well, I do and today it was making pillows. Better yet, remaking pillows. 
I titled this post vintage pillows and in a way are. I had some pillows that were looking quite worn and really in need of a redo. I intend on using them in my bedroom so I went with colors and fabric I had used in the quilt I recently finished.

Some of my fabrics that I used were quite old so it really brought the vintage feel to the pillows.

The fabric being older also made me want to use some piping to give the pillows a little more strength in the seams 
and I think it also gave the pillows a little more shape .


You can purchase piping at craft stores but sometimes it's hard to find just what you want in mind.
Sometimes the quantity you want might make it a better choice to make it yourself.
I make mine by sewing a piece of cording or natural rope between the piece of fabric I'm wanting to use .


The first pillow. 
You know that just got me started. I played around with different stuff I had until I had satisfied my need for pillows.

Thank you for stopping by.
I hope you're inspired to make some pillows too.
Be Blessed!

Friday, November 13, 2015

My Lazy Days Star Quilt


Hey! I'm Glad you came by for a visit.
 I'm also glad to finally be able to show you my Star Quilt I've been working on for a little while now. 
Right out of the gate, I must tell you I'm not the state fair kind of quilter or really any comparison to a good quilter. I just love quilts! My grandmother made them for everyone getting married or having a baby and some just because she thought you might need another. 

My grandmothers quilts were made of scraps she collected for worn clothing and various other places and she also tack quilted. She would have bags and bags of pieces cut and a few patterns drown somewhere. They were an extension of her love that she sewed on her Singer Pedal sewing machine.

My quilts are scrap quilts as well and fabric I just come along with. I don't tack quilt and I don't have quilting frame. I can't really devote the space to a huge frame. My style is just to throw them on the floor or across the bed and baste stitch it together. 
I can also be a bit lazy as quilting goes. My pieces are rather large. I know myself enough to know I don't always have the patients or the time.

This quilt I made for my own bed which is King size. So it's really quite a big quilt when speaking of quilts. 
It is typical of the quilts I've done in the past; there are pieces of old clothing, pieces from a few of Grandma's old chenille bed spreads, and some new( scrap) fabric that we make where I work. So all in all it is full of pieces of my life.

Thank you for stopping by 
and
letting me share my
 love of  a quilt 
with you.

BE  BLESSED!

Thursday, November 12, 2015

Farmer's Market Lawn Chair


Good Thursday Mornin' !
I hope everyone remembered our veterans yesterday. I sure appreciate our service men and women. I have many in my family. 
It's been quite hectic around here lately and I haven't been able to squeeze time for blogging or posting. Things are beginning to settle down a bit and I have been up to some more crazy crafting and recycling. I thought I'd chair my renewed lawn chair with you.


This project started with the Ole' Man saying, "Hey you don't want this do ya? I'm getting ready to haul it off?"
and 
to that I said, "Yeah, yeah, I do!"
I began with the thought of just using chair binding, the kind that's kind of burlapy with the red in it. I have bottomed straight back chairs with it in the past. I've always been able to pick it up in the craft department at Wal-mart but not anymore, at least not at ours. I didn't have the notion to put a full blown hunt for it so I went with a different option.


I sprayed the frame with flat  black spray paint after removing all the screws. Then I attached this very natural fabric I already had. It needed a little something else so I used a stencil to put my farmer's market lettering on.

It was a little hap-hazard in the coming along but I enjoyed this little project and I think in turn I have a enjoyable little chair to pull out.
I appreciate you stopping by for a little visit.
Be Blessed!